As mentioned in one of my previous posts I am now an official educator for the Be Creative range of nail design products. YAY!
Our first run of workshops will introduce the Be Creative products to nail technicians to get you all to 'Think Outside The Box', showing and helping to inspire on how to incorporate the products into their favourite nail brands/products. A fab workshop to give ideas and to inspire all involved to help their business and skills grow, giving great designs to the clients.
The Be Creative products include acrylic nail paint, gel paint, a unique nail art pen, velveteen, pigments and many more. I will update the blog soon on some of the great designs you can achieve.
If you are interested in attending one of these workshop across the country let me know as there is a great team of educators on board from north to south so please feel free to contact me on here or by email to theresa.bloor@gmail.com and I will get the correct contact for your area.
Have a great week!.
Thursday, 4 October 2012
Be Creative Nail Art Workshops
Labels:
be creative,
Beauty by Theresa,
gel paint,
velveteen
Wednesday, 19 September 2012
Educating Nails News
As many of you know I have been a big fan of the Be Creative by Sam Biddle Nail Design products for some time now and I am absolutely thrilled and delighted to announce that from October 2012 I will be an Educator for the Be Creative by Sam Biddle Design Team.
A number of workshops will be launched and details of each workshop will be added on here as and when they become available.
I hope I can do Sam Biddle and her team proud and cant wait to attend the Educators workshop at the end of September. x x x
A number of workshops will be launched and details of each workshop will be added on here as and when they become available.
I hope I can do Sam Biddle and her team proud and cant wait to attend the Educators workshop at the end of September. x x x
Labels:
be creative,
Beauty by Theresa,
sam biddle
Update on Shrinking Violet Fat Loss Wrap Treatment
I know it's been a while since I told you all about Shrinking Violet but as I have now started with this treatment on clients I thought it was about time to tell you all about the results.
Many of my distant colleagues have been reporting great inch losses so although I am incredibly busy with my existing clients treatments I just couldn't help but want to take part in the buzz that is going around the beauty world with Shrinking Violet.
I have trialled a few cases with this treatment but went live recently with new clients booking in. The results so far are as good as the talk and great immediate results are showing with losses ranging between 5 and 16 inches!
I will add more to this blog soon but wanted to let you all know the results so far - a great treatment all round I say!
Saturday, 1 September 2012
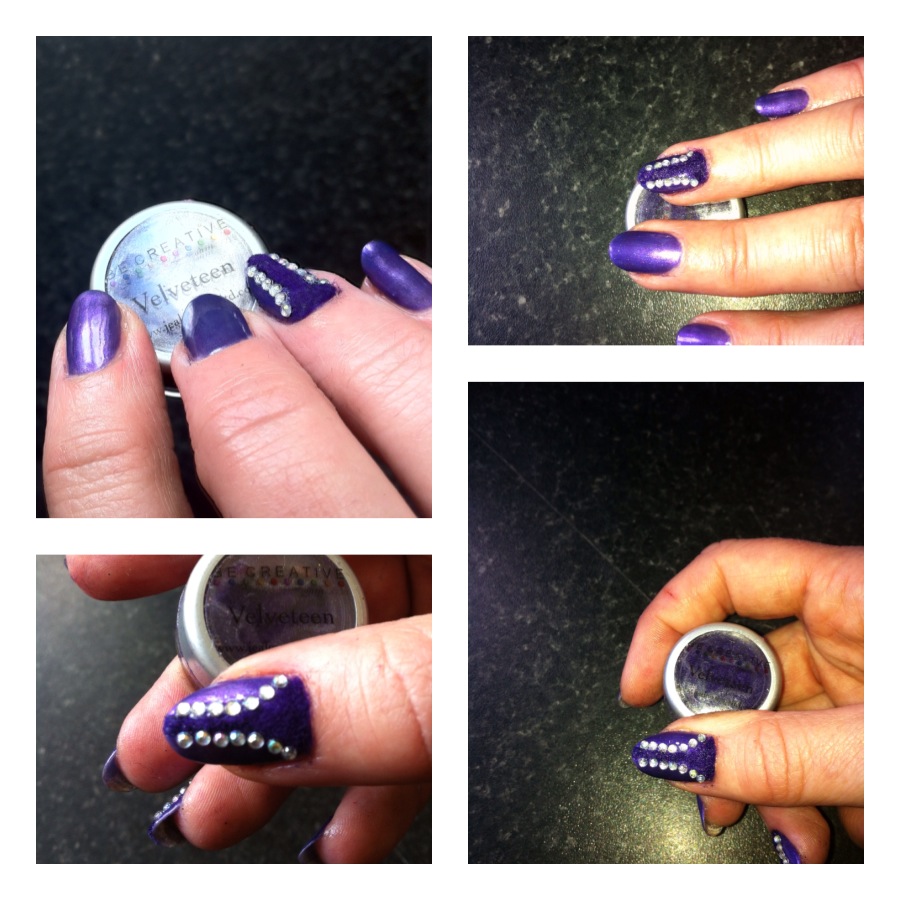
Velveteen Nails fro Be Creative by Sam Biddle
I know its been a while so thought I would show you some pictures of nails done with my nail art toys:
This design is done using the Velveteen Nail art products from Be Creative by Sam Biddle .
It is a great way to add something a little different to your clients manicures.
Enjoy x x x
This design is done using the Velveteen Nail art products from Be Creative by Sam Biddle .
It is a great way to add something a little different to your clients manicures.
Enjoy x x x
Labels:
be creative,
velveteen
Friday, 18 May 2012
New Nail Innovation Ideas - Velveteen Nails and Mica Nail Pigments
Just a quick post to tell you all about some new nail products I am current testing:
Velveteen Nails and Mica Nail Pigments.
Velveteen is what it says on the tin - makes you nails have a velvet finish. Very weird I know and I just couldn't imagine how it would feel so I just had to get hold of some. And yes - it does feel like velvet on your nails! lol. I am yet to put it on an actual nail design and not just a colour stick but I will post a picture when I do.
Available from Sam Biddle at Be Creative "is proud to announce the arrival of Velveteen to the UK, an innovative material which sits on the surface of your nails, it is completely water and solvent proof and extremely hard wearing. What’s so special is that it feels soft, like velvet. Wearing Velveteen is an inexpensive way to create a rich, luxurious effect, and applying to the whole nail or incorporating it within nail art means it takes nail art design to the next level. "
This revolutionary new product can be used on natural nails or enhancements, and needs nothing more than a UV lamp to cure the gel sealer required to bond the fibres. To apply, simply sprinkle this fine material onto the wet gel and then cure for 2 minutes. Brush away the excess and return to the jar. You can use Velveteen with any gel sealer, but it must not leave an inhibition layer. You can also apply Velveteen with regular top coat over polish.
I am looking to combine this Velveteen in my next nails design so keep checking back to see the results.
Mica Pigments - Mica mineral is commonly found in make-up and has been widely used in many cosmetics for years. Mica can be found and applied in loose powder form, pressed powder form, and even mixed with other agents to become a gel, oil, cream, or liquid. Because of the versatility of mica's consistency, you can easily and professionally apply in a variety of ways.
Some of my colleagues have experimented in using it with gel nail polishes and as you know, me being a massive fan of anything different with gel polish I too am currently experimenting to see how they can be used in nail designs. I believe that CND are actually due to launch 'addditives' later this year which seem to work in the same/similar way. So I can see the use of mica pigments in nails becoming really popular.
I will soon update you all on my findings with these exciting new ideas!
Labels:
Beauty by Theresa,
mica nail pigments,
velveteen
Thursday, 17 May 2012
The Future for Beauty by Theresa
For a while now I have been working on a plan to further develop my career in the Beauty Industry - really its like merging 2 of my past careers together.
Some of you know in a previous life I worked in Human Resources - in fact gaining a post graduate qualification through CIPD (Chartered Institute of Personnel and Development for you none HR people out there). My biggest passion in HR was the training and development side and am not boasting when I say that the awards and accolades I received during that career showed that training and development was a natural passion and flair that I excelled at.
So now my next career step is to combine my 2 career passions and become a trainer within my current work in the Beauty Industry!
In recent years the government has specified that:-
"to train in the Adult Sector From September 2007, all new tutors, trainers and teachers in England have needed to meet qualification requirements described by the Department for Education and Skills (DfES)"
- basically, despite my post graduate qualification previously gained I now need to hold a 'PTLLS' (Preparing to Teach in the Life Long Learning Sector) qualification so I am currently beavering away getting this award.
As well as continuing to carry out Beauty Treatments to my ever expanding client base I will be teaching as a Freelance Trainer in Beauty, to train those who also wish to follow my career path in the Beauty Industry. Freelance Training will hopefully enable me to train in the products and treatments that are amongst the best in the industry and using my skills to ensure that the newbies in the industry follow with the same professional passion for the treatments and clients as I do!
I will keep you all posted when my training courses start but I feel lots of exciting times ahead!
Labels:
Beauty by Theresa,
Beauty Training
Sunday, 29 April 2012
Artistic Gel Polish Colour Fade - Step by Step
Many of you Professional Nail people out there have been asking how I achieve the colour fade look that so many of my clients are having this season. So, with the kind permission of Louella Belle, UK Artistic Colour Gloss Distributor I have done some simple step by step photos and video to show you how I achieve the look:
The colours used in this example are Lovely, Trendy, Diva Chic and Princess. I dont always use this number of colours as it all depends on what finish the client is looking for.
Step 1. Apply the Bonding layer as normal and cure for the recommended time.
Step 2. Apply the first coat of colour as you would for a normal overlay and cure - in this example 'lovely' was used. As the colour stick was clear I applied 2 coats of this colour and cured in between each layer.
This image shows how it looks after this colour has been applied.
Step 4. Apply the next deeper colour using the same sponging method, but only apply over the tip of the nail where the darker colour is needed.
This shows how the fade looks after the last colour has been applied with the sponge and cured.
Step 5. Apply the sparkle colour 'Princess' over the whole nail as normal with the brush and cure.
Step 6. Apply the Glossing Gel layer as normal over the whole nail and cure to seal the design and add that fabulous shine!
This is the finished look used with the above steps and give you a brief guide. However, this step by step is just a great introduction to the 'Artistic Design Class' which will give you even better hands on experience for learning this technique and lots of other designs too.
This method may vary from that in the Artistic Design Class and I also vary the method I use depending on which colours the clients would like and the finished look they want. So, go ahead and experiment and find a way that works for you.
Thank you to Louella Belle for your permission in allowing me to publish this 'step by step guide' .
If this proves popular let me know if there is a particular nail design you would like to know how to do and I will see what I can do. Please feel free to add comments on here.
For that added bit of giggle - lets see if you can guess what I was watching whilst recording the video and what other multi-task duty I was also doing at the same time!?!?! (hit - you may need to turn your speaker volume up) . . . . . Answers on a Post Card to Beauty by Theresa x x x lol
The colours used in this example are Lovely, Trendy, Diva Chic and Princess. I dont always use this number of colours as it all depends on what finish the client is looking for.
The recommended preparation/application guidelines given by the manufacturer for all products must be followed on all occasions to achieve that professional look.
Step 1. Apply the Bonding layer as normal and cure for the recommended time.
Step 2. Apply the first coat of colour as you would for a normal overlay and cure - in this example 'lovely' was used. As the colour stick was clear I applied 2 coats of this colour and cured in between each layer.
Step 3. This is the first stage that is different than a normal colour overlay. Instead of applying the next colour with a brush I actually apply it with a sponge. In this example I used a make-up sponge but have tried different sponges which each give a slightly different effect. Try different ones yourself and see which you prefer. The colour I used here was 'Trendy'.
Cure after sponging this colour on.
Below is a brief video showing the technique to apply this first colour:
Cure after sponging this colour on.
Below is a brief video showing the technique to apply this first colour:
This image shows how it looks after this colour has been applied.
Step 4. Apply the next deeper colour using the same sponging method, but only apply over the tip of the nail where the darker colour is needed.
This shows how the fade looks after the last colour has been applied with the sponge and cured.
Step 5. Apply the sparkle colour 'Princess' over the whole nail as normal with the brush and cure.
Step 6. Apply the Glossing Gel layer as normal over the whole nail and cure to seal the design and add that fabulous shine!
This method may vary from that in the Artistic Design Class and I also vary the method I use depending on which colours the clients would like and the finished look they want. So, go ahead and experiment and find a way that works for you.
Thank you to Louella Belle for your permission in allowing me to publish this 'step by step guide' .
If this proves popular let me know if there is a particular nail design you would like to know how to do and I will see what I can do. Please feel free to add comments on here.
For that added bit of giggle - lets see if you can guess what I was watching whilst recording the video and what other multi-task duty I was also doing at the same time!?!?! (hit - you may need to turn your speaker volume up) . . . . . Answers on a Post Card to Beauty by Theresa x x x lol
Subscribe to:
Posts (Atom)